

備忘録程度に…
◆事前準備
サンプルアプリダウンロード
git clone https://github.com/WASdev/ci.docker.tutorials.git
server.xml作成
そこそこテキトーに作ったので何か問題があったら指摘してください!
<?xml version="1.0" encoding="UTF-8"?>
<server description="Default server">

    <!-- Enable features -->
    <featureManager>
        <feature>javaee-8.0</feature>
        <feature>adminCenter-1.0</feature>
    </featureManager>

    <!-- This template enables security. To get the full use of all the capabilities, a keystore and user registry are required. -->

    <!-- For the keystore, default keys are generated and stored in a keystore. To provide the keystore
password, generate an
         encoded password using bin/securityUtility encode and add it below in the password attribute of the keyStore element.
         Then uncomment the keyStore element. -->
    <!--
    <keyStore password=""/>
    -->
    <featureManager>
      <feature>ssl-1.0</feature>
    </featureManager>

    <keyStore id="defaultKeyStore" password="" />

    <!--For a user registry configuration, configure your user registry. For example, configure a basic
user registry using the
        basicRegistry element. Specify your own user name below in the name attribute of the user element. For the password,
        generate an encoded password using bin/securityUtility encode and add it in the password attribute of the user element.
        Then uncomment the user element. -->
    <basicRegistry id="basic" realm="BasicRealm">
        <!-- <user name="yourUserName" password="" />  -->
        <user name="admin" password="adminpwd" />
        <user name="nonadmin" password="nonadminpwd" />
    </basicRegistry>

    <administrator-role>
      <user>admin</user>
    </administrator-role>

    <!-- To allow access to this server from a remote client host="*" has been added to the following element -->
    <httpEndpoint id="defaultHttpEndpoint"
                  host="*"
                  httpPort="9080"
                  httpsPort="9443" />

    <!-- Automatically expand WAR files and EAR files -->
    <applicationManager autoExpand="true"/>

    <remoteFileAccess>
     <writeDir>${server.config.dir}</writeDir>
    </remoteFileAccess>

</server>
◆Docker操作
コンテナ作成
docker run -d -p 81:9080 -p 82:9443 --name wsl websphere-liberty
起動確認
以下のURLへアクセスする。
http://localhost:81
以下の画面が表示されていればOK。

コンテナID確認
docker ps
サンプルアプリをコンテナ内へコピー
cd ci.docker.tutorials/app
docker cp ServletApp.war [コンテナID]:/tmp/ServletApp.war
server.xmlをコンテナ内へコピー
docker cp server.xml [コンテナID]:/tmp/server.xml
◆コンテナ内での操作
以下のコマンドなどを利用してコンテナへアクセスします。
docker exec -it [コンテナID] /bin/sh -c "[ -e /bin/bash ] && /bin/bash || /bin/sh"
サンプルアプリの移動
cp /tmp/ServletApp.war /config/dropins/app.war
server.xmlの移動
cp /tmp/server.xml /config/server.xml
adminCenter-1.0のインストール
installUtility install adminCenter-1.0

Establishing a connection to the configured repositories ...
This process might take several minutes to complete.

Successfully connected to all configured repositories.

Preparing assets for installation. This process might take several minutes to complete.
Step 1 of 8: Downloading restConnector-1.0 ...
Step 2 of 8: Installing restConnector-1.0 ...
Step 3 of 8: Downloading adminCenter-1.0 ...
Step 4 of 8: Installing adminCenter-1.0 ...
Step 5 of 8: Downloading jaxrs-1.1 ...
Step 6 of 8: Installing jaxrs-1.1 ...
Step 7 of 8: Validating installed fixes ...
Step 8 of 8: Cleaning up temporary files ...


All assets were successfully installed.

Start product validation...
Product validation completed successfully.
◆動作確認
サンプルアプリ
以下のURLへアクセスする。
http://localhost:81/app
以下の画面が表示されればOK。

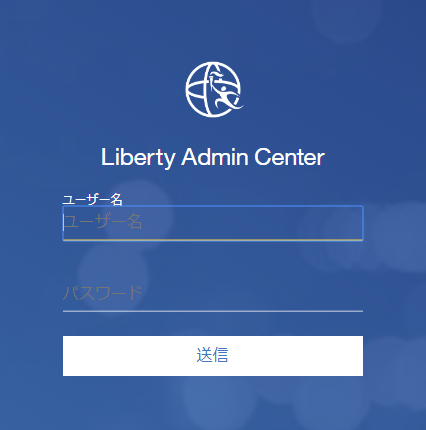
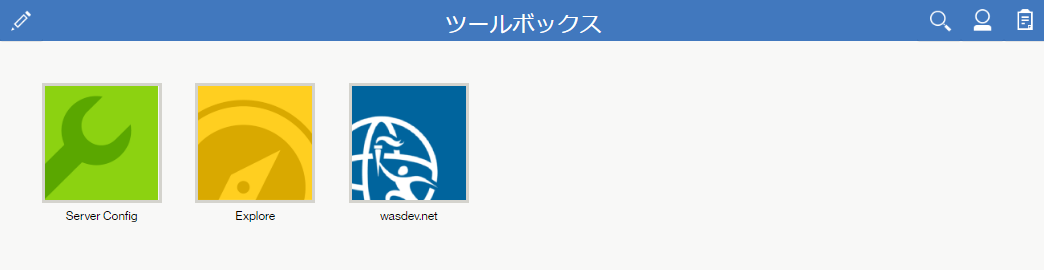
adminCenter
以下のURLへアクセスする。
※HTTPSでのアクセスでないとエラーになるので注意
https://localhost:82/adminCenter
以下のログイン画面が表示されるので、server.xmlで設定したIDとパスワードを入力してログインする。
以下の画面が表示されればOK。
◆参考サイト
WAS Liberty 環境を Docker 上で動かしてみよう
Admin Center
次はここでSpringを動かす方法でも…(*’▽’)